RN-CameraRoll
最近APP有一个业务需求,需要将APP中web加载出来的图片保存到本地,保存至本地相册。很方便的是RN为我们提供了CameraRoll模块,以获得去访问本地相册,以及将图片存储至相册的功能。这里我们主要用将图片存储这个功能。访问相册的话,由于CameraRoll没有提供相册UI页面以及诸多功能。要实现选取图片的话还是使用第三方的react-native-image-crop-picker微妙。基本没什么坑
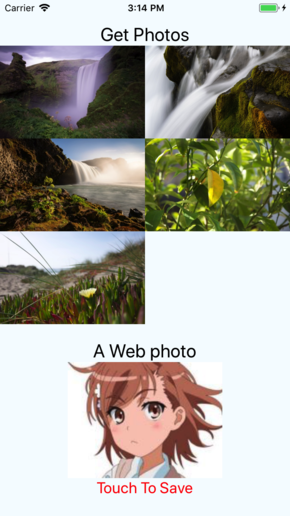
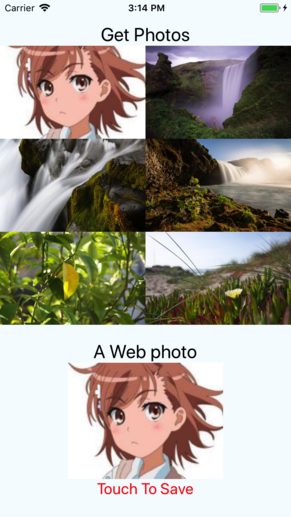
CameraRoll使用起来非常简单不过需要注意的是,IOS这边需要在info.plist中添加NSPhotoLibraryUsageDescription,访问相册的权限。
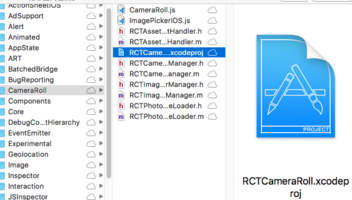
以及在使用该模块前你需要先链接RCTCameraRoll库(在node_modules/react-native/Libraries/CameraRoll)
将RCTCameraRoll工程添加到当前工程的Libraries文件夹下,然后把ibRCTCameraRoll.at加在TARGETS->Build Phaese->Link Binary With Libraries里面
 CameraRoll主要有三个静态方法以供使用。
1.static saveImageWithTag(tag) //保存一个图片到相册
2.static saveToCameraRoll(tag, type?) //把图片或视频保存到相册中
3.static getPhotos(params: object) //返回一个带有图片标识符对象的Promise
CameraRoll主要有三个静态方法以供使用。
1.static saveImageWithTag(tag) //保存一个图片到相册
2.static saveToCameraRoll(tag, type?) //把图片或视频保存到相册中
3.static getPhotos(params: object) //返回一个带有图片标识符对象的Promise
话不多说,上代码:
import React, { Component } from 'react'
import {
  Text,
  View,
  Image,
  CameraRoll,
  StyleSheet,
  Dimensions,
  Alert,
  ScrollView,
  TouchableOpacity
} from 'react-native'

const fetchParams = {
  first: 6,
  groupTypes: 'All',
  assetType: 'Photos'
}

const webImgUrl = `https://tva2.sinaimg.cn/crop.0.0.750.750.180/68f74d54jw8f22cfa95ijj20ku0kumy7.jpg`

export default class useLib extends Component {
  constructor (props) {
    super(props)
    this.state = {
      photos: []
    }
  }

  componentDidMount () {
    this.getPhotos()
  }
  getPhotos () {
    CameraRoll.getPhotos(fetchParams).then((data) => {
      console.log(data)
      let edges = data.edges
      let photos = []
      for (var index in edges) {
        photos.push(edges[index].node.image.uri)
      }
      this.setState({
        photos: photos
      })
    },
       (error) => { Alert.alert(error) })
  }

  showPics (photos) {
    return (
      <View style={styles.picWrapper}>
        {
          photos.map((result, index, arr) => {
            return (
              <Image
                key={index}
                style={styles.libPic}
                source={{uri: result}}
              />
            )
          })
        }
      </View>
    )
  }
  handleClick = () => {
    CameraRoll.saveToCameraRoll(webImgUrl)
      .then(data => {
        let photos = this.state.photos
        photos.unshift(data)
        this.setState({
          photos: photos
        })
      })
      .catch(err => {
        Alert.alert(err)
      })
  }
  render () {
    return (
      <ScrollView style={styles.container}>
        <Text style={styles.title}>
          Get Photos
        </Text>
        {this.showPics(this.state.photos)}
        <Text style={styles.subTitle}>
          A Web photo
        </Text>
        <Image
          style={styles.webPic}
          source={{uri: webImgUrl}}
        />
        <TouchableOpacity
          style={styles.btnWrapper}
          onPress={this.handleClick}
        >
          <Text style={styles.btnText} >
            Touch To Save
          </Text>
        </TouchableOpacity>
      </ScrollView>
    )
  }
}

const styles = StyleSheet.create({
  container: {
    flex: 1,
    backgroundColor: '#F5FCFF'
  },
  title: {
    alignSelf: 'center',
    marginTop: 30,
    fontSize: 24
  },
  picWrapper: {
    flexDirection: 'row',
    flexWrap: 'wrap',
    marginBottom: 20,
    width: Dimensions.get('window').width
  },
  libPic: {
    width: Dimensions.get('window').width / 2,
    height: 120
  },
  webPic: {
    alignSelf: 'center',
    width: 200,
    height: 150
  },
  subTitle: {
    alignSelf: 'center',
    fontSize: 24
  },
  btnWrapper: {
    alignItems: 'center',
    width: Dimensions.get('window').width,
    height: 40
  },
  btnText: {
    fontSize: 20,
    color: 'red'
  }
})